MATH IS FOR BLOCKERS!
Or maybe not. In Magic: The Gathering, math plays a critical role in many aspects of the game. One key concept every player must deal with is variance—the element of uncertainty and randomness that affects the outcome of every match.
Variance takes on an even more significant role in singleton formats like Commander, where every card is unique. In this article, we’ll explore how variance impacts gameplay, strategy, and how players can learn to navigate its challenges to improve their performance.
What is variance?
In Magic: The Gathering, variance refers to the disparity between what the numbers suggest and what actually unfolds during a game. Imagine a 60-card deck with 21 lands. Statistically, you’d expect to draw around 7 lands within your first 20 cards. But when reality diverges from this expectation, you’re experiencing variance. It’s this unpredictability that makes every game of Magic unique.
Variance is what makes every game of Magic unique and unpredictable. As Mark Rosewater, Magic’s head designer, has pointed out, variance is essential for keeping the game exciting. In his articles “Variance, Part 1” and “Variance, Part 2” Rosewater dives deeper into this concept, highlighting how variance introduces tension and fun into the game. While variance adds thrills, too much can frustrate players by making them feel powerless. It’s a delicate balance—too much control can lead to boredom, but too much randomness can steal the sense of agency.
In his piece “Vintage 101: Dealing with Variance”, Joseph Dyer explores how newer Vintage players struggle with variance, especially when facing restricted cards like Ancestral Recall. It often feels like your opponent is constantly drawing the perfect card, but this is frequently just selective perception at work. The same feeling can occur in Centurion Commander 1v1. Variance leads to situations where luck plays a major role, but it’s crucial to recognize that these events are part of the game—and that many of our losses are due to poor decisions or suboptimal choices.
The most skilled players learn to embrace variance, developing an ability to anticipate and adapt. They fine-tune their decks to minimize unpredictability and sharpen their decision-making to turn luck into opportunity. Mastering variance is crucial for competitive success, especially in fast-paced formats like Centurion, where each decision can mean the difference between victory and defeat.
Deckbuilding
In Magic: The Gathering, deckbuilding is an intricate art form that directly influences how much variance will impact your games.
By incorporating cards that allow you to dig deeper into your deck or search for specific pieces, you can significantly reduce variance and boost consistency. Including multiple cards with similar effects further stabilizes your deck. For instance, when constructing an artifact combo deck, the white, blue, and black colors offer some of the most powerful tutors for consistency, such as Enlightened Tutor, Transmute Artifact, and [c]Tainted Pact[/c]. This strategy minimizes the randomness, improving the odds of drawing the right cards when they matter most.
How Many Lands to Play
AA well-built deck with a balanced mana base reduces variance by limiting the risk of mana screw (drawing too few lands) or mana flood (drawing too many). Both scenarios can derail your strategy and compromise your game plan, making a solid land distribution essential for consistent performance.
Finding the right balance of lands is crucial. A helpful guideline comes from Frank Karsten, one of the most analytical minds in Magic and a member of the Magic: The Gathering Hall of Fame. Karsten, who has participated in nearly 80 Pro Tours and holds a PhD in game theory and probability theory, developed a formula to calculate the optimal number of lands in a deck. This formula can be adapted for Commander, helping you fine-tune your land count for greater reliability.
31.42 + 3.13 * the average mana value of your spells – 0.28 * the number of low-cost cards that provide card draw or mana ramp - (0.74 * untapped MDFC) - (0.38 * tapped MDFC)
The result gives you the number of lands you should play, adjusted by the MDFCs (Modal Double-Faced Cards) you include. MDFCs that enter tapped, like Jwari Disruption, count as 0.38 lands, while untapped ones, like Emeria’s Call, count as 0.74 lands.
While this formula isn’t perfect for Centurion Commander, it’s still a great starting point. If you’re interested in how this formula can be better tailored for singleton formats, you can check out Kelvin Chen’s article “How To Build A Manabase For Singleton Formats”.
Probability
If we want to improve the structure of our deck, we can consider using the hypergeometric distribution, a statistical model that describes the probability of obtaining a certain number of successes in a sample, drawn without replacement, from a finite population.
To apply the hypergeometric distribution to Centurion Commander deckbuilding, you simply input the required data into one of the many online calculators, such as those on Aetherhub or Statrek.
Here are the parameters you need to input:
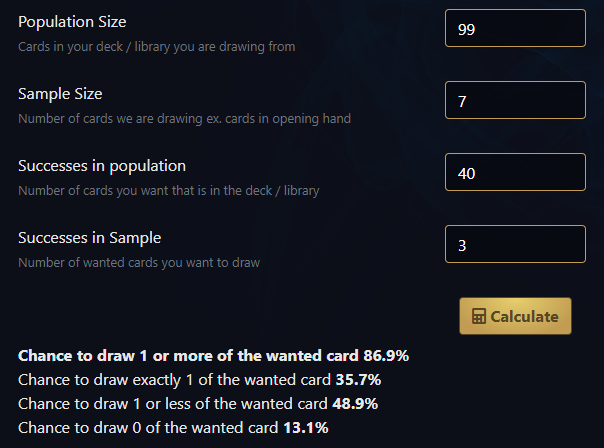
| Population size | The total number of cards in your deck at the start of the calculation. For example, 99 cards in Centurion Commander. |
| Sample size | The number of cards you draw. For example, 7 cards for your opening hand. |
| Success in population | The number of specific cards you want to draw. For example, 40 land. |
| Success in sample | The number of cards you want to see in your opening hand. For example, 3 lands. |
If this seems complicated, don’t worry—we’ll go over some examples shortly to clarify things.
Once you input these parameters, the calculator will provide a range of useful probabilities to help optimize your deck:
- The probability of drawing a certain number of cards, equal to or fewer than the desired amount.
- The probability of drawing exactly that number of cards.
- The probability of drawing fewer cards than desired.
- The probability of drawing none of the desired cards.
Using these tools allows you to approach deckbuilding and gameplay more scientifically, reducing the impact of variance and increasing the odds of drawing the right cards at critical moments.
YYou may be wondering if the hypergeometric distribution is only useful for determining how many lands to include in a singleton deck. The answer is no—this statistical model can be applied to various scenarios, even in formats like Centurion Commander. Below are a few ways you can categorize cards in your deck and calculate the probabilities of drawing from a specific category:
- By mana cost. For instance, if you want to know the likelihood of drawing one of your 1-mana cards in the early turns.
- By card type. The hypergeometric distribution can help you calculate the chances of drawing non-creature spells (e.g. prowess deck) or enchantments (e.g. thematic deck) in your opening hand.
- By function. Want to know how likely you are to have a counterspell or a removal spell in your opening hand? Or how often you’ll find a mana dork in the early turns to ramp your game? The hypergeometric distribution gives you detailed probability calculations for these scenarios as well.
Now, let’s dive into some concrete examples of how to apply the hypergeometric distribution to optimize your deck.
How Many Artifacts for Mox Opal?
Let’s say you want to determine the probability of activating Mox Opal in the early turns of a game, similar to what a Reddit user attempted. In this example, we aim to find the ideal number of artifacts you need in your deck so that, if you draw Mox Opal in your opening hand, you’ll have enough artifacts to tap for mana. Keep in mind, we’re assuming you already have Mox Opal in hand, so these percentages represent the likelihood of drawing 2 artifacts in your first 6 cards, since Mox Opal is already accounted for.
The hypergeometric distribution allows us to calculate the exact probabilities of finding those artifacts in the opening hand. Our current deck has 12 artifacts—let’s see if that’s a good number.
| Population size | 98 cards. We start with 99 cards in the deck, minus the Mox Opal that’s already in hand. |
| Sample size | 6 cards. Since we’re not considering mulligans and we’ve already removed Mox Opal, we’re left with 6 cards from the opening hand. |
| Success in population | 12 artifacts. These are the remaining artifacts, excluding Mox Opal. |
| Success in sample | 2 artifacts. The minimum number of artifacts needed to activate Mox Opal. |
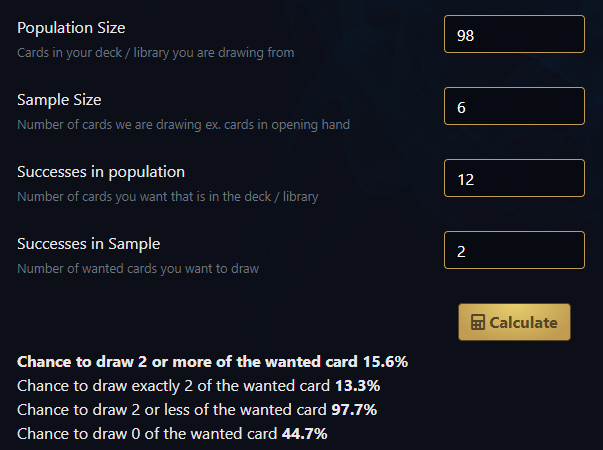
With 12 artifacts, we have about a 15.6% chance of opening a hand with 2 or more artifacts. That’s relatively low, so let’s see how increasing the number of artifacts affects this probability.
With 14 artifacts, the probability rises to 20%.
To double the probability to around 32%, you would need at least 19 artifacts. However, this is still far from a percentage that would make us feel confident about consistently activating Mox Opal.
In Commander, it’s rare for a deck to be able to play 3 artifacts on turn 1, so we can adjust our calculations to focus on activating Mox Opal by a slightly later turn.
| Artifact Count | Probability of Success |
| 12 | 15.63% |
| 13 | 17.94% |
| 14 | 20.32% |
| 15 | 22.76% |
| 16 | 25.25% |
| 17 | 27.78% |
| 18 | 30.34% |
| 19 | 32.91% |
| 20 | 35.48% |
| 21 | 38.05% |
| 22 | 40.61% |
| 23 | 43.15% |
| 24 | 45.67% |
| 25 | 48.15% |
Since we don’t necessarily need Mox Opal to be active on turn 1, we can extend our calculations to later in the game and adjust the input for the calculator accordingly.
Let’s do some further calculations to see the probability of drawing at least 2 artifacts by turn 3 on the draw (your opponent went first). To do this, we simply increase the sample size to account for the 3 additional cards drawn by turn 3.
By analyzing the results, we can choose a probability that seems acceptable for our strategy and adjust the number of artifacts in the deck accordingly.
Of course, if a 72.5% probability seems too low for you, you can increase the artifact count beyond 25 to reach higher probabilities.
| Artifact Count | Probability of Success |
| 12 | 30.31% |
| 13 | 34.08% |
| 14 | 37.82% |
| 15 | 41.51% |
| 16 | 45.13% |
| 17 | 48.67% |
| 18 | 52.10% |
| 19 | 55.42% |
| 20 | 58.61% |
| 21 | 61.66% |
| 22 | 64.58% |
| 23 | 67.36% |
| 24 | 69.99% |
| 25 | 72.47% |
How Many Blue Cards for Force of Will?
We’re building a tempo deck, aiming to play our commander on turn 3 on the play (we go first). If we want to protect its entry with Force of Will, how many blue cards do we need in our deck to have a high probability of exiling one for the iconic counterspell?
| Population size | 98 cards. Since we’re removing Force of Will from the 99-card deck (it’s already in hand). |
| Sample size | 8 cards. We remove Force of Will from the 7-card starting hand and add 2 cards drawn by turn 3. |
| Successes in population | 15 blue cards. |
| Successes in sample | 1 card to exile. |
Using the hypergeometric distribution, we can determine the probability of having a blue card to exile.
The following table shows the success probabilities based on the number of blue cards in the deck.
The calculations show that with 24 blue cards (excluding Force of Will), there’s a 90.42% probability of having a blue card to exile. This probability is high enough to reliably protect your commander.
| Blue cards count | Probability of Success |
| 10 | 59.15% |
| 15 | 74.93% |
| 20 | 85.1% |
| 22 | 88.01% |
| 24 | 90.42% |
| 26 | 92.39% |
| 28 | 94.01% |
| 30 | 95.30% |
| 32 | 96.35% |
| 34 | 97.18% |
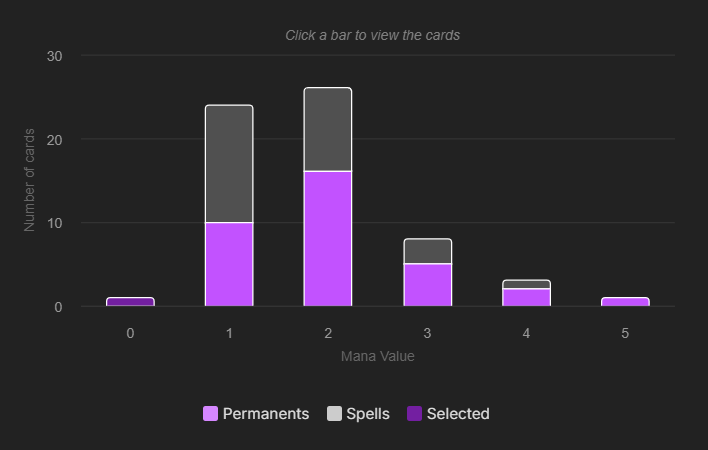
Mana Curve
A well-balanced mana curve helps reduce variance by ensuring your mana is efficiently used throughout the game. A good curve means you’ll have playable cards at every stage of the game, which improves consistency and helps you manage the game better. Having options like activated abilities or repeatable effects ensures that your mana is always well-spent. You can learn more about it through this guide by Frank Karsten.
The commander’s mana cost also impacts the curve. For example, if you’re playing a commander with a converted mana cost of 2 that you want to cast on turn 2, you’ll need to balance your curve accordingly. Being able to play threats or answers at the right time can give you a huge advantage, even if you have fewer cards in hand. This concept of tempo refers to using your mana more efficiently than your opponent, as explained by Tom Anderson in his article.
Tools like Moxfield or other deckbuilding sites provide detailed statistics to help you spot anomalies and better manage your mana curve.
Keeping an eye on the mana costs of your spells and the colors your lands, artifacts, and creatures can produce is essential.
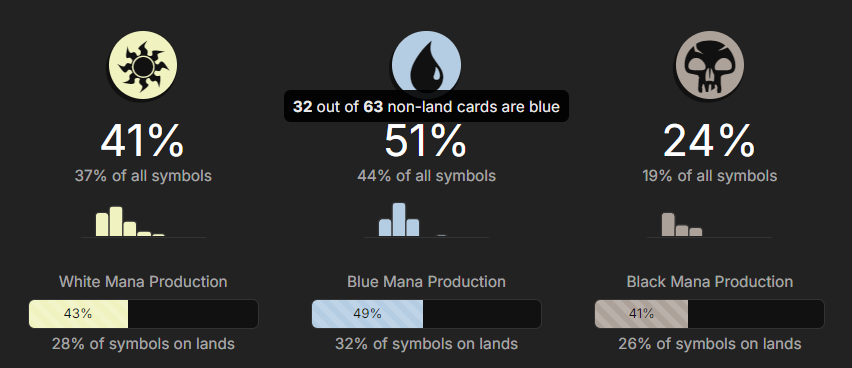
For a more analytical approach, Frank Karsten’s articles (yes, him again!) provide excellent guidance on managing colored mana resources based on your deck’s mana costs. He dives into calculations that optimize your mana base depending on the specific color requirements in your deck.
Fetch lands
How do fetch lands affect gameplay in Centurion Commander? Let’s try some hypothetical calculations.
We have two 99-card decks with 37 lands each, one with fetchlands and the other without. Assuming we draw the same cards under the same conditions, let’s calculate the probability of drawing a land.
| With fetch lands | Without fetch lands |
| Turn 1 You’re on the play. You open with a hand containing 3 lands. You play your fetch land and fetch another land from the deck. Now, 33 lands remain in the deck (37 lands – 3 drawn – 1 fetched). lands left / cards in deck * 100 = 33/91*100=36,3% | Turn 1 You’re on the play. You open with a hand containing 3 lands and play a land. Now, 34 lands remain in the deck (37 lands – 3 drawn). lands left / cards in deck * 100 = 34/92*100=36,95% |
| Turn 2 You draw a spell and play a second fetch land, fetching another land. Now, 32 lands remain, and there are 89 cards left in the deck. lands left / cards in deck * 100 = 32/89*100=35,9% | Turn 2 You draw a spell and play a second land. Now, 34 lands remain in the deck with 91 cards left. lands left / cards in deck * 100 = 34/91*100=37,36% |
| Turn 3 You draw a land and play a third fetchland to get another land. Now, 30 lands remain in the deck with 87 cards left. lands left / cards in deck * 100 = 30/87*100=34,48% | Turn 3 You draw a land and play a third land. Now, 33 lands remain with 90 cards left in the deck. lands left / cards in deck * 100 = 33/90*100=36,66% |
Fetch lands slightly reduce the probability of drawing lands as the game progresses, helping to filter out lands, which can reduce mana flood in the later stages of the game. This advantage can help increase the likelihood of drawing impactful spells instead of excess lands as you proceed further into the game.
Starting Hand
A deck that relies on specific card combinations to launch its strategy can easily fall victim to variance if those key cards don’t appear in the opening hand. That’s why it’s crucial to identify which cards are most valuable to have right from the start—not only to advance your strategy but also to react to or disrupt your opponent’s plans.
Take Hogaak, Arisen Necropolis as an example. While its playstyle might seem straightforward to newer players, not knowing which cards are essential in your opening hand can leave you too slow or at the mercy of your opponent’s aggression. Some decks force you to mulligan aggressively just to stay competitive.
The hypergeometric distribution can help you calculate the odds of drawing a specific card—or a category of cards—after deciding to keep your opening hand.
Let’s consider a scenario: you’re on the draw and have kept an initial hand of 7 cards. Your hand includes:
- 5 spells with a converted mana cost of 1 or 2.
- 1 spell with a converted mana cost of 3.
- Only 1 land.
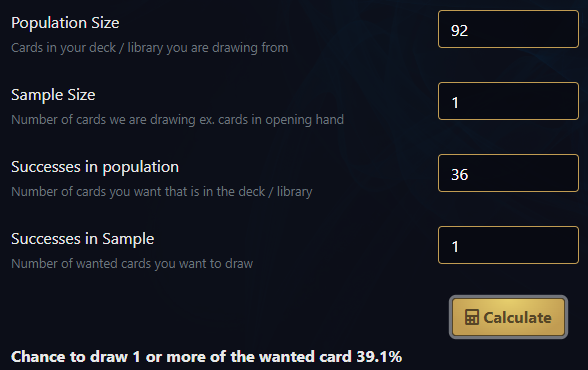
If your deck has 37 lands, what are the odds that your next draw will be a land?
In this case, you simply divide the number of remaining lands by the number of cards left in your deck and multiply by 100 (36/92 * 100 = 0.3913 * 100 = 39.13%) to get the probability as a percentage.
The same result can be found using the hypergeometric distribution:
- Population size: 92 cards (99 total in the deck minus the 7 you’ve kept).
- Sample size: 1 card
- Successes in population: 36 lands remaining in the deck
- Successes in sample: 1
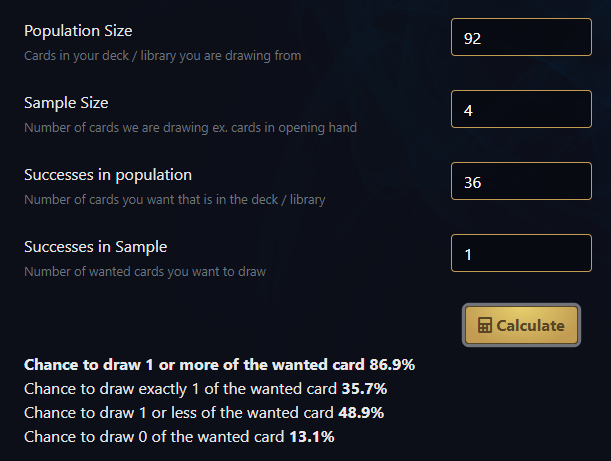
What happens if your opening hand includes cards that allow you to dig deeper into your deck?
Naturally, this percentage changes. For example, if one of the spells is Preordain, your chances of finding a land increase significantly. The sample size shifts from 1 to 4: 1 card drawn for the turn + 2 cards scryed to the bottom + 1 card drawn from Preordain.
Shuffling Your Deck Properly
After finishing a game of Magic, every player collects their cards to shuffle the deck before the next match. Often, cards are picked up from different zones, leaving lands grouped together or spells from the graveyard stacked in a similar way.
If you don’t shuffle your deck properly, you run the risk of starting the next game with a hand that mirrors how the cards were reinserted. Shuffling correctly is crucial to ensure that no player has any knowledge of card positions in the deck. This includes both individual cards and groups like lands, which often end up together if not shuffled thoroughly. For example, arranging lands and spells in an alternating pattern, known as “mana weaving,” is not an acceptable way to shuffle, as it doesn’t create a truly random result.
When considering official rules, keep in mind the guidelines in Magic Tournament Rules 3.10 and Comprehensive Rules 701.19.
The pile shuffle method—where you deal your deck into smaller piles—is also not sufficient for randomization. It merely rearranges the cards without introducing actual randomness. If you know where a card is before performing a pile shuffle, its position will remain predictable afterward.
To achieve proper randomization, ensure that every card is shuffled at least 7–8 times. Take your time to thoroughly mix your deck and ensure fairness for both players.
For a deeper dive into proper shuffling techniques, check out these instructional videos:
Testing Your Deck
In the Centurion Commander format, variance is amplified by the singleton nature of the deck, making it more challenging to replicate consistent results from game to game. To accurately gauge a deck’s true potential, you need to play a substantial number of games. Winning 7 out of 10 games might seem promising, but it’s not enough to draw solid conclusions, as variance could have significantly influenced the outcomes. Only through extensive testing can you obtain a clearer understanding of your deck’s real performance.
Making even a small change, like swapping out a single card, requires time to show meaningful results. For instance, replacing a counterspell might not have a noticeable impact in the first ten games, making it hard to assess its effectiveness. Therefore, it’s essential to thoroughly test any modifications to determine whether they truly enhance your deck.
If you’re testing a specific card and want to reduce the time it takes to see results, you can use certain methods to ensure access to that card during playtesting. Here are a few techniques:
- Draw 6 cards and add the card you want to test to your hand.
- Place the test card on top of your deck if you want to evaluate it during a later stage of the game, ensuring you draw it at the right moment
- Draw 7 cards, shuffle the test card into the top 20 cards, and place them on top of your deck to simulate a realistic but controlled chance of drawing the card.
These methods can help you streamline your playtesting process, allowing you to focus on how specific cards perform in different phases of the game.
To aid in your testing sessions, we’ve also created a spreadsheet where you can log your testing data. This will help you track your results and draw more accurate conclusions. Simply open the document, go to File > Make a copy, and start entering your data into the blank sheet.
Additionally, many Centurion players use the free online platform Cockatrice to test their decks and experiment with new cards. If you want to play Centurion from the comfort of your home, you can find the Cockatrice guide on our Discord server.
The metagame
As explained by Riccardo Piraccini in our “Beginner’s guide” the term “metagame” refers to the prevalent strategies and decks in a given competitive environment. While it may sound technical, it essentially means understanding which decks and tactics you’re most likely to face and adjusting your own choices to improve your chances of success. In other words, the metagame is the “game beyond the game,” where deckbuilding decisions and tournament performances continuously shape each other.
The metagame is constantly evolving. Dominant decks and strategies shift in response to new innovations and trends. For example, if aggressive (aggro) decks become dominant, you’re likely to see a rise in control decks designed to counter them. However, variance can play a major role in this dynamic. Even a well-constructed control deck may falter if it doesn’t draw the right answers at the right time, potentially losing to less powerful aggro decks simply due to unlucky draws.
In Centurion Commander, the metagame is particularly diverse and dynamic. While competitive, this format accommodates a wide range of players and strategies, leading to a broader variety of archetypes than traditional formats. Without the luxury of a sideboard, key decisions have to be made during deck construction and are immediately relevant from game one in a best-of-three match.
This creates a unique challenge in terms of match-ups and opponent strategies. Players must be especially adept at identifying the most relevant threats to their deck and selecting cards accordingly. Facing a wide range of strategies requires meticulous preparation and a deep understanding of the meta.
Dealing with variance in Centurion Commander isn’t just about refining your deck; it also requires strategic foresight. Understanding the decks you’re likely to encounter and the cards they typically play will help you make informed decisions during your games.
The decisions you make during a Centurion Commander game can significantly influence variance and often determine the outcome of the match. Every choice—from when to play a card, how to manage your resources, and which threats to prioritize—can either amplify or mitigate the effects of variance.
The complexity and impact of these decisions can vary widely. For instance, a sorcery that deals 3 damage to an opponent has limited versatility compared to an instant that deals 3 damage to any target, which offers greater strategic flexibility and adaptability in different situations.
Centurion rewards players who can make the most out of even the subtlest decisions. Experienced players recognize that calculating the probability of an opponent holding a specific card is a key aspect of strategic play. Often, it’s advantageous to “play around” what you suspect your opponent might have. For example, if you hold a Brainstorm but believe your opponent might have an Orcish Bowmasters, it could be wiser to wait until they’re tapped out or until you can respond effectively.
Play with the aim of putting yourself in the most favorable position possible, striving for victory. This is important both at the beginning of the game and in its later stages. When you reach the “top deck” phase and both players have run out of cards in hand, it’s not uncommon to think, “What luck! They drew exactly the card they needed!” While this can be the case at times, understand that stronger players position themselves strategically so that a specific card (or series of cards) can turn the tide of the game—these are known as “outs.” Reading your opponent’s behavior, based on battlefield clues and subtle shifts in their demeanor, can make the difference between victory and defeat. Magic is a game where bluffing and understanding what your opponent is thinking are just as crucial as the cards in your hand.
If you want to explore how to play in a way that maximizes your “outs,” I recommend checking out Allen Wu’s article, where he uses the hypergeometric distribution to provide real numbers that can help fine-tune your strategies.
Even with the most well-crafted strategy, variance can impact a player both positively and negatively. The key to competitive success in Magic is not just accepting variance, but learning how to manage it both mathematically and strategically. Doing so will help you maintain the right mindset and elevate your performance over time.